

This post may contain affiliate links. Where I make a small commission on purchased items, at no extra cost to you. See my disclosure for details.
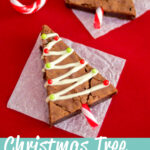
Looking for something fun to make with the kids over Christmas? Or need an easy festive homemade gift? These CRAZY cute Christmas tree brownies are just what you need! Read on for the easy step by step picture recipe…
With just over a week left until the big day, I found myself wondering what other awesome Christmas bakes I could try – then I came up with these little beauties. Christmas tree brownies!
Not only are they delightfully gooey and rich, they’re really fun to decorate AND vegetarian and gluten free. It’s also a great recipe to get the kids involved in. What more could you want?!
Can't face cooking dinner on Fridays? 😩
Imagine a guilt free Friday night dinner, without the exhausting mental load. BYOD Fridays are a fun and supportive Friday night community for tired people who still need to cook, but really cba 💛
Join The CommunityOne thing to note – these brownies work best if made the night before and allowed to cool completely before attempting to slice and decorate. Also, they are the most awesome, rich and gooey brownies you will ever make. (And that’s a KitchenMason promise!)
If you love helpful tips and want to boost your baking knowledge, check out baking for beginners!
If you like this recipe…
…you might also like:
Christmas Tree Brownies – Step by Step Picture Recipe
(For a printer friendly version, see the recipe card at the end of this post)
Please note, this recipe includes both UK metric and US Cup measurements.
Ingredients
Here is what you will need to make 14.
For the brownie
- 250g (8.8 oz) Dark Chocolate
- 100g (3.5 oz) Milk Chocolate
- 200g (3/4 Cup + 1/8 Cup) Unsalted Butter, Room Temp
- Pinch of Salt
- 3 Eggs, Room Temp
- 250g (1 + 1/4 Cups) Dark Muscovado Sugar
- 1 tsp Vanilla Extract
- 50g (1/3 Cup) Gluten Free Self Raising Flour *
For the decoration
- Pack of Candy Canes **
- 100g (3.5 oz) White Chocolate **
- Red/Green Sugar Balls **
Essential equipment
- 30 x 20cm Rectangular Cake/Swiss Roll Tin
- Large Bowl
- Spatula or Wooden Spoon
- Electric Stand Mixer or Large Bowl and Electric Hand Whisk
- Wire Rack
- Disposable Piping Bag
*Regular self raising flour works fine if you don’t need it to be gluten free.
** Most are vegetarian/gluten free but check the label just in case.
Instructions
Grease and line the cake tin and set to one side until needed. Preheat your oven to 190°C/Fan 170°C/374ºF.
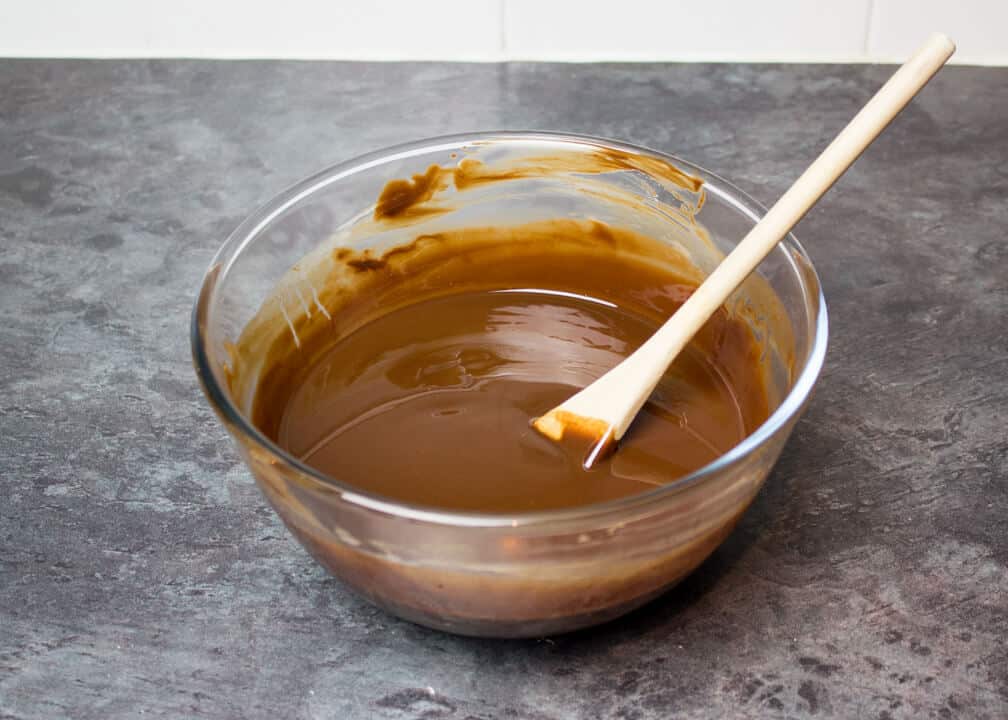
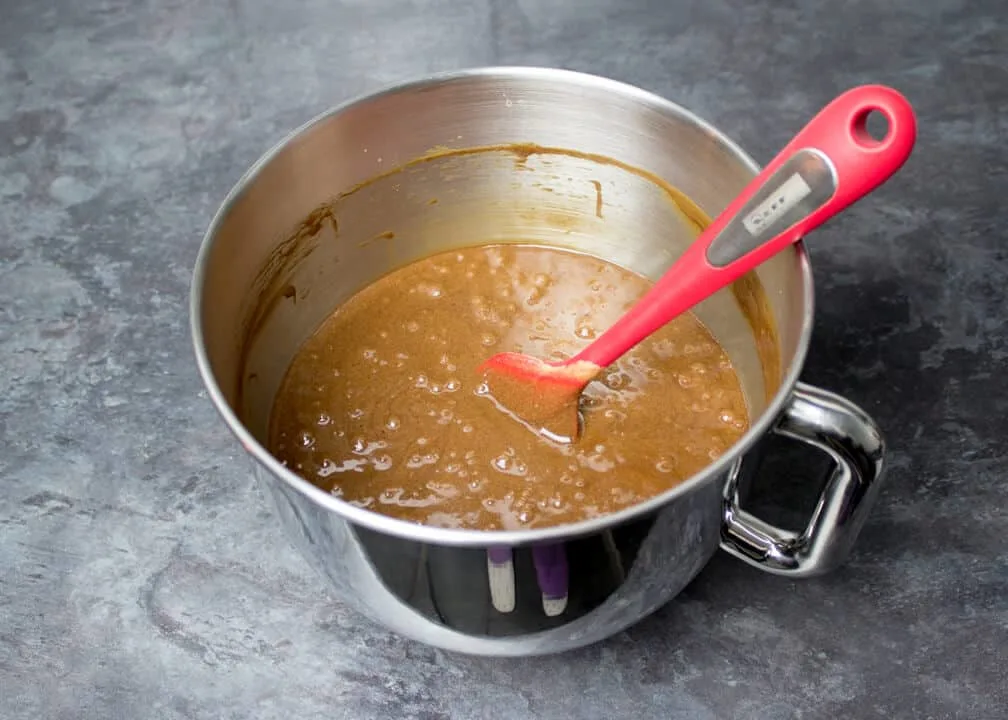
Break the dark (250g | 8.8 oz) and milk chocolate (100g | 3.5 oz) into a large bowl and add the butter (200g | 3/4 Cup + 1/8 Cup) and salt (pinch). Gently melt either in a bowl set over a pan of barely simmering water or in the microwave.
Stir until smooth and shiny then leave to one side to cool.
Either in an electric stand mixer with the balloon whisk attachment or in a large bowl with an electric hand whisk – whisk the eggs (x 3) for at least 3-4 minutes until really light and pale.
It should leave a slight trail when you remove the balloon whisk/beaters.
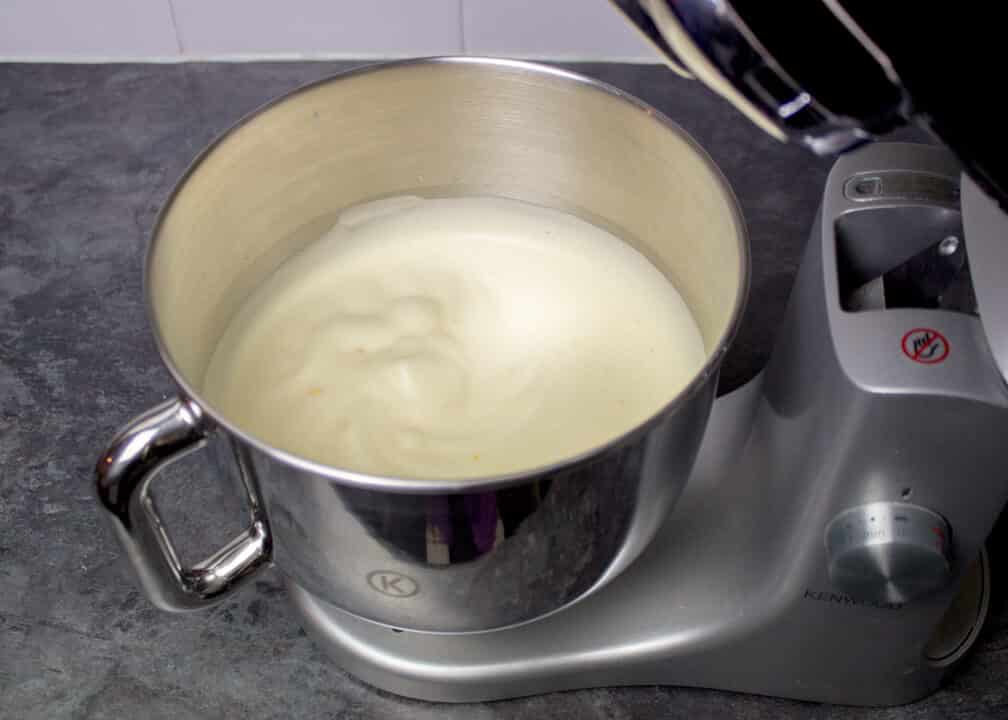
Add in the muscovado sugar (250g | 1 + 1/4 Cups) and vanilla extract (1 tsp) and whisk again until evenly blended but still fairly light in texture.
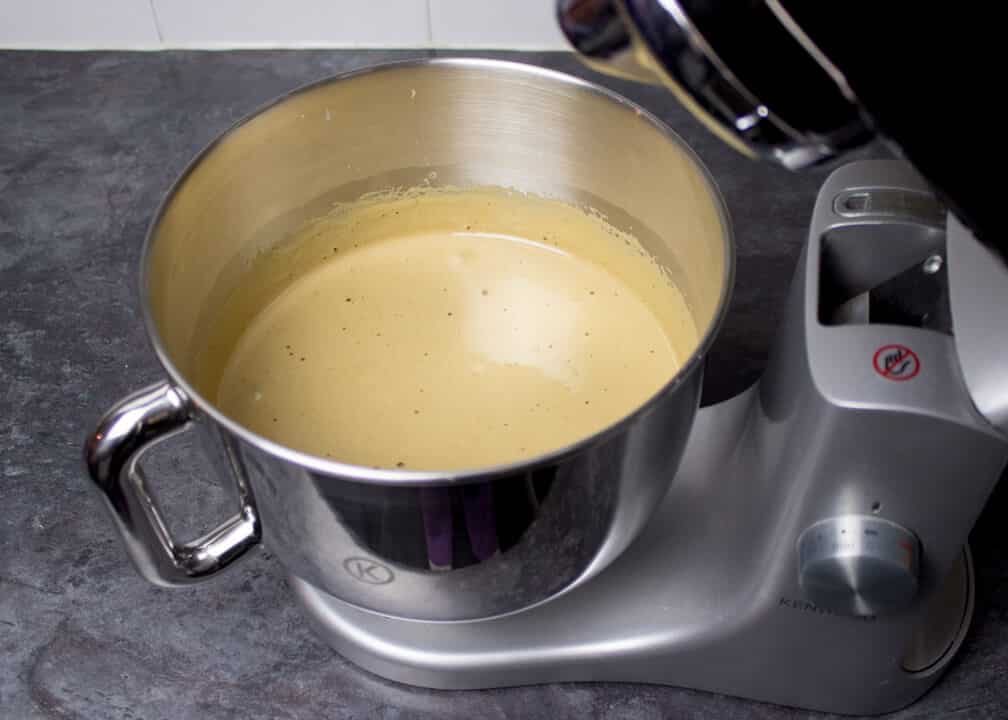
In thirds, pour in the cooled chocolate and gently fold through using a rubber spatula.
Sift over the flour (50g | 1/3 Cup) and carefully fold this in – just until you can’t see any more lumps of flour and the mixture is smooth and still quite light.

Pour the mixture into the prepared cake tin – be careful not to overfill as it will rise slightly.
Then bake in the preheated oven for approx 25-30 minutes.

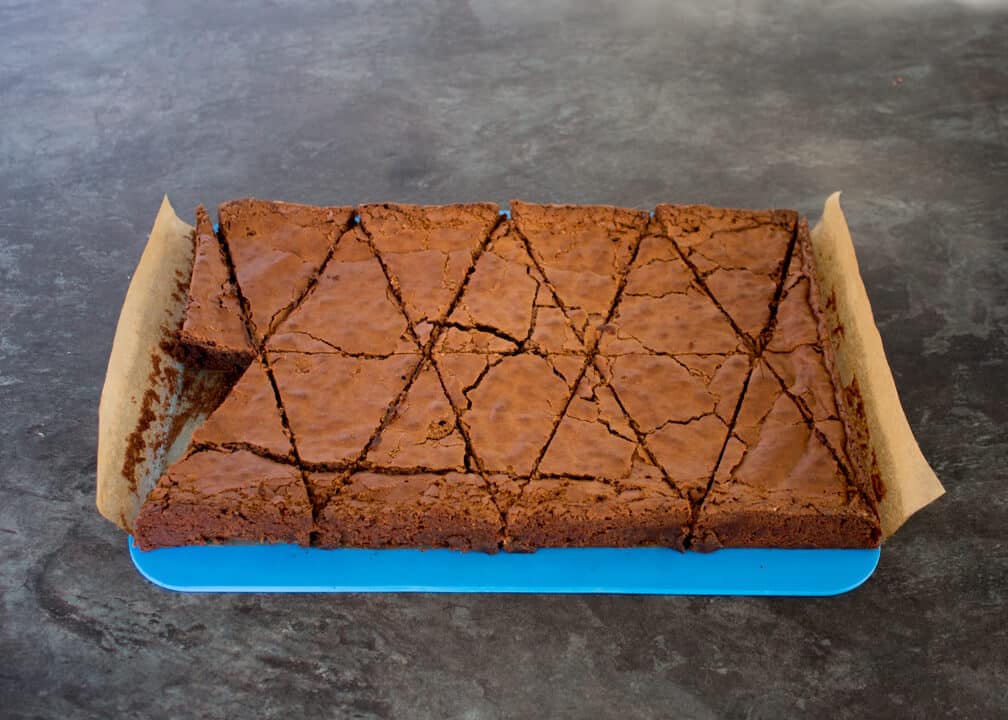
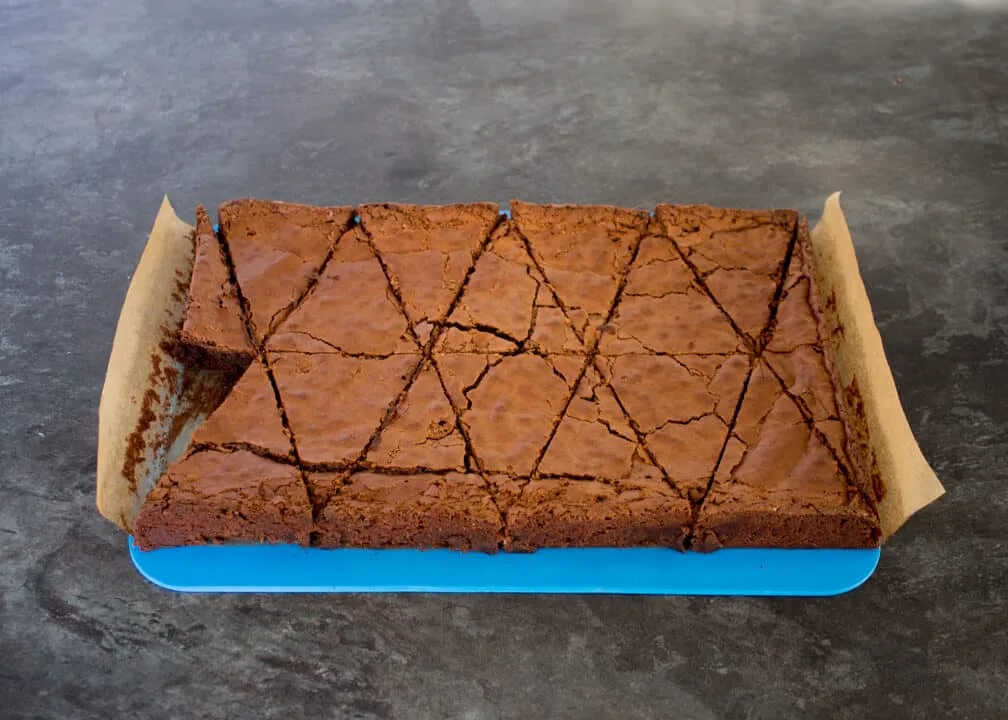
As mentioned before, it is best to make these brownies the night before and allow to cool completely before attempting to remove from the tin and slice.
So, when completely cooled -run a spatula down the sides of the brownie to release from the tin then gently lift out and place on a chopping board/mat.
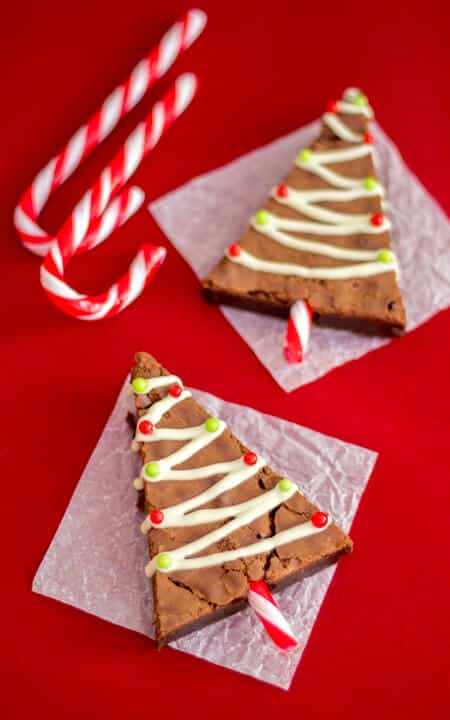
Now, I’m a bit of a perfectionist, so yeah – I got a ruler out at this point! But basically, cut the brownie into 14 triangles. You will have 4 spare bits for you to taste test too! (Clearly I couldn’t wait to take a photo…)
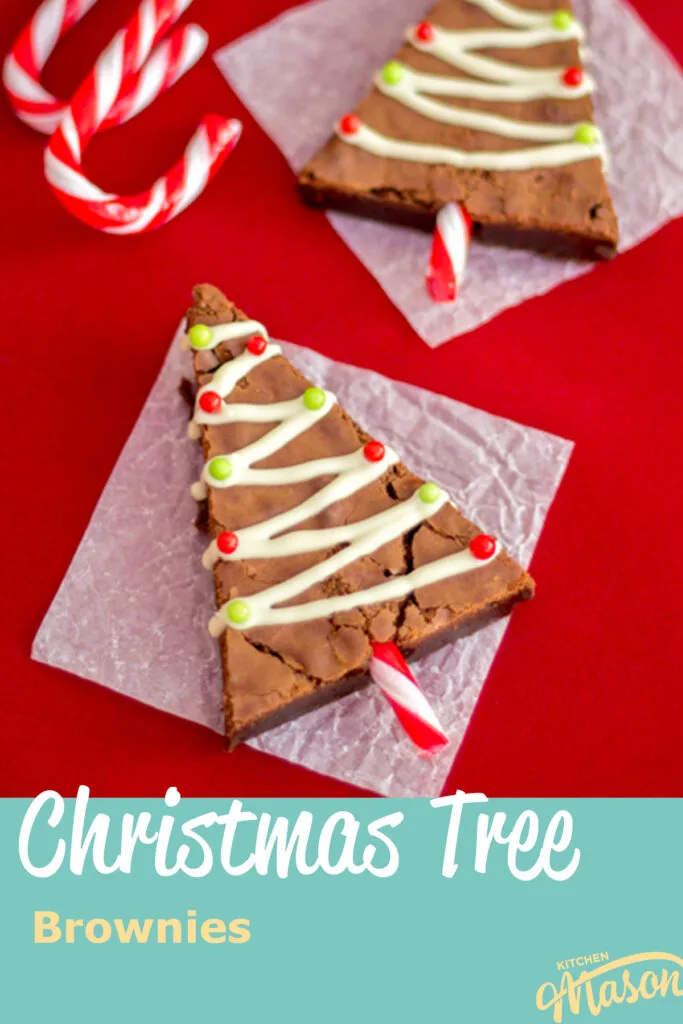
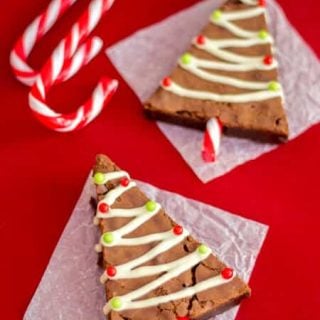
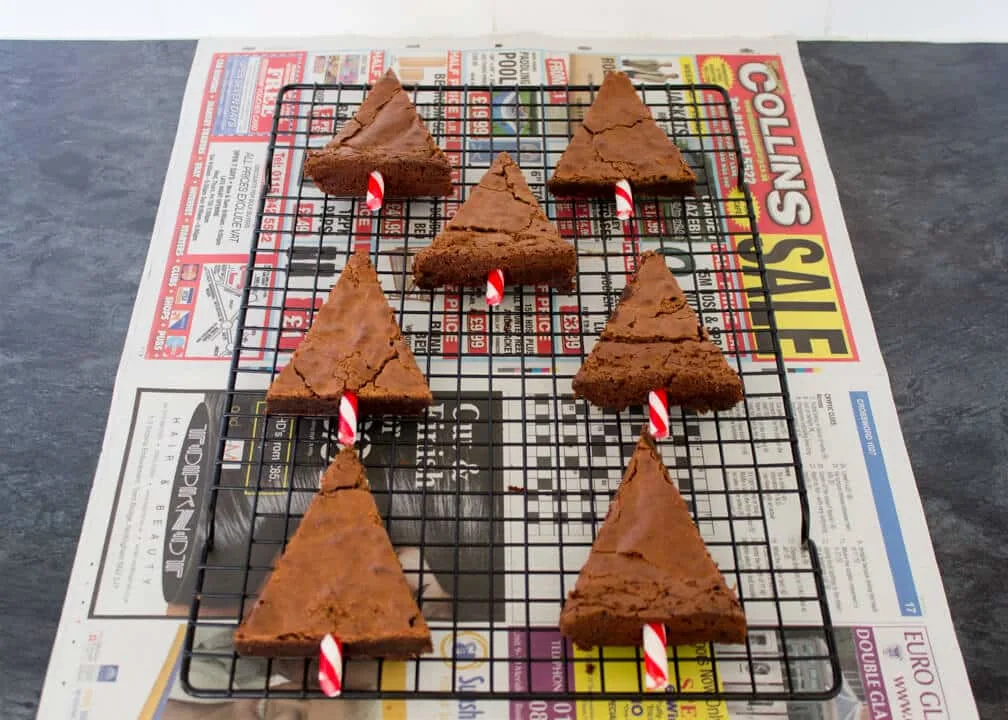
Take each candy cane out the wrapper and snap into pieces approx 3cm long.
Place the brownies on a wire rack over a piece of newspaper and carefully insert a piece of candy cane into the base of each one.

Melt the white chocolate in either a bowl set over a pan of barely simmering water or in the microwave and pour into a piping bag.
Snip the end and pipe ‘tinsel’ across each tree then place sugar balls down the edges in the chocolate for the baubles.
I found it best to decorate in half batches – just to ensure the chocolate doesn’t set before you have stuck the ‘baubles’ in.

Allow the chocolate to set for about 30-40 minutes or so before either devouring straight away or placing in nice presentation boxes to give as gifts to your loved ones.
I find it best to store these in an air tight container in the fridge – due to their extreme ‘gooeyness’ they can become a little delicate if stored at room temperature.

Go on, admit it – they’re SO cute aren’t they?! I think these make great little home made gifts for people and, with the decoration element – you can let the kids go nuts adding edible glitters, hundreds and thousands or whatever else they can think of!
Loved this recipe? Pin it!


Cute Christmas Tree Brownies Recipe
Rich, fudgy and delicious - these super cute Christmas tree brownies are a wonderful homemade gift!
Ingredients
- 250g (8.8 oz) Dark Chocolate
- 100g (3.5 oz) Milk Chocolate
- 200g (3/4 Cup + 1/8 Cup) Unsalted Butter, Room Temp
- Pinch of Salt
- 3 Eggs, Room Temp
- 250g (1 + 1/4 Cups) Dark Muscovado Sugar
- 1 tsp Vanilla Extract
- 50g (1/3 Cup) Gluten Free Self Raising Flour *
For the decoration
- 100g (3.5 oz) White Chocolate **
- Red/Green Sugar Balls **
- Pack of Candy Canes **
Essential Equipment
- 30 x 20cm Rectangular Cake/Swiss Roll Tin
- Large Bowl
- Spatula or Wooden Spoon
- Electric Stand Mixer or Large Bowl and Electric Hand Whisk
- Sieve
- Wire Rack
- Disposable Piping Bag
Instructions
For the brownies
- Grease and line your cake tin and preheat the oven to 190°C/Fan 170°C/374ºF. Break the dark and milk chocolate into a large bowl and add the butter and salt. Gently melt over a pan of barely simmering water. (Or you can heat in 10 second intervals in the microwave.)


- Break the eggs into an electric stand mixer (or use a large bowl with a handheld electric whisk) and whisk the eggs for about 4-5 mins. They will be light, fluffy and dramatically increase in volume. It should leave a slight trail when you remove the whisk.

- Add in the sugar and vanilla. Mix again until light.

- Pour the cooled melted chocolate into the eggs in thirds. Gently fold through with a spatula. Then sieve the flour in and fold carefully until there are no more visible streaks.

- Smooth the mixture out into your lined tin, and bake in the preheated oven for 25-30 mins. Don't overfill the tin as it will rise slightly during baking. Allow to cool completely before cutting. Overnight is best.


To decorate
- When completely cooled, remove the brownie from the tin and slice into 14 triangles. (You will likely have a few tiny bits spare to taste test!) I used a ruler to help.

- Place the brownies onto a wire rack set over some paper or a tray. Break the candy canes into 3cm pieces, and carefully insert them into the bottom part of the brownie triangles, to resemble a tree trunk.

- Then melt the white chocolate in 10 second intervals in the microwave (or in a bowl set over a pan of barely simmering water) and pour into a piping bag. Snip the end and pipe zigzags across each brownie. This is to resemble tinsel. Then place a few sugar balls on the ends of those zigzags. These will look like baubles. Allow to set on the rack.


Notes
*Regular self raising flour works fine if you don’t need it to be gluten free.
** Most are vegetarian/gluten free but check the label just in case.
If you would rather use a more in depth picture recipe, please see the main body of this post.
Please note, this recipe includes both UK metric and US Cup measurements.
Storage
Store in an airtight container in the fridge and consume within 5-7 days.
Recommended Products
As an Amazon Associate and member of other affiliate programs, I earn from qualifying purchases at no extra cost to you.


Nutrition Information:
Yield: 14 Serving Size: 1Amount Per Serving: Calories: 375Total Fat: 23gSaturated Fat: 14gTrans Fat: 0gUnsaturated Fat: 8gCholesterol: 75mgSodium: 85mgCarbohydrates: 40gFiber: 2gSugar: 34gProtein: 4g
Nutritional information on kitchenmason.com should only be used as a general guideline, I am not a certified nutritionist. Please always check labels for allergens where applicable.
Other tasty Christmas bakes…

Emma is a British recipe writer, home cook, and founder of Kitchen Mason. For over 15 years, she has been creating simple, comforting recipes and practical kitchen tips that help tired, everyday people make dinner feel easier and more enjoyable again. Passionate about British home cooking, Emma shares reliable recipes, comforting classics, and realistic kitchen guidance designed for real life. Her work has also been featured in publications including Food Network, Cosmopolitan, and The Huffington Post.
Knowledgeable On: British home cooking, Easy dinner ideas, Comford food recipes, Recipe writing
AppetiteDeluxe
Sunday 11th of January 2015
love this idea
Yana
Tuesday 6th of January 2015
Wow, I like the 'crackling' on your brownies! I must try your recipe! :)
Sweet and Savoury Pursuits
Monday 15th of December 2014
Love the way these look!
Miss KitchenMason
Monday 15th of December 2014
Thanks!
missemzyy
Sunday 14th of December 2014
What a great idea! They look so cute and delicious!!
Miss KitchenMason
Sunday 14th of December 2014
Thanks! Hope you give them a go :)